1.Getting Started
MCA Suite offers a wide range of features and capabilities to help manage your business. Those features can seem overwhelming at first so we’ve put together a couple of short walkthroughs to help you quickly get started using the application. These guides are not meant to serve as a complete tutorial but rather to get your feet wet with what MCA Suite can do. If you would like a more thorough explanation of everything the application has to offer, feel free to explore the user guide and our support site.
1.1.Funder Quick Start
For our quick start example as a Funder let’s assume your company, Apple Funding, is a funder and that you have offered to fund a merchant, Petey’s Pizza, $10,000 for new kitchen equipment at a factor of 1.2. This guide will walk you through the process of setting up your company, creating an application for the merchant and ultimately funding the deal.
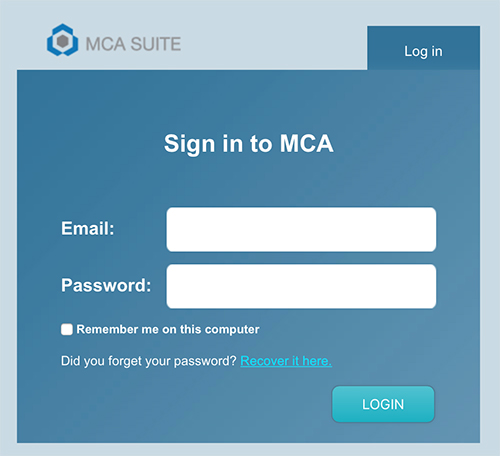
Step 1: Sign in to MCA Suite
Use the email and password provided to you when signed up with MCA Suite to log in.
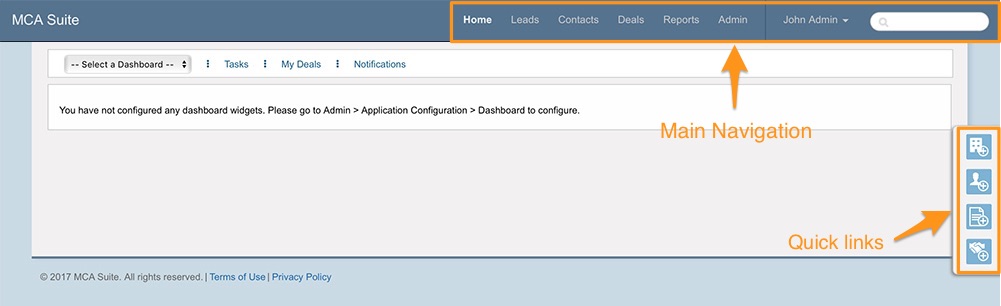
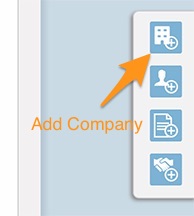
When you first log in to MCA Suite, you will be brought to your dashboard. Note the main navigation bar along the top. It will serve as your primary means of navigating around the application. On the right hand side are a few icon links that help you get add information quickly: add a company, add a contact, add an application and add a deal.
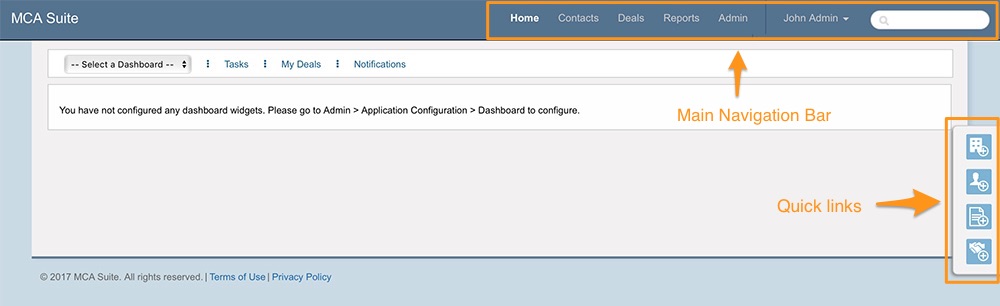
It looks pretty empty at the moment, so let’s start adding some content.
Related: Navigation, Quick Links, Dashboards
Step 2: Add your company as a Funder
A “Company” in MCA Suite is a type of contact. It can be any merchant, broker, funder, collector, or credit card processor in your network. Let’s start by adding your company, Apple Funding, as a funder. Using the quick links on the right hand side of the screen, click the top icon to add a company. This will bring you to the add contact screen.
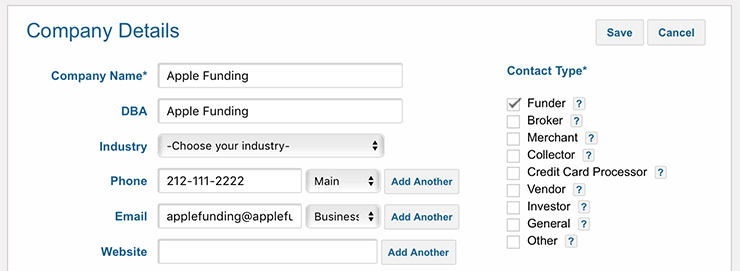
Fill out any relevant information and click the Save button. The only required fields are Company Name and Contact Type (denoted by the asterisk).
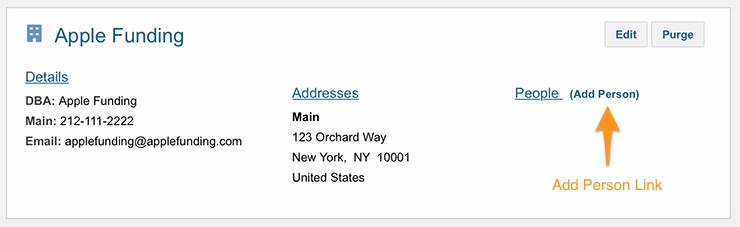
After saving the company, you will see a green confirmation message and be brought to a summary page. This page includes basic company information (address, phone number, etc), any notes about the company and associated tasks.
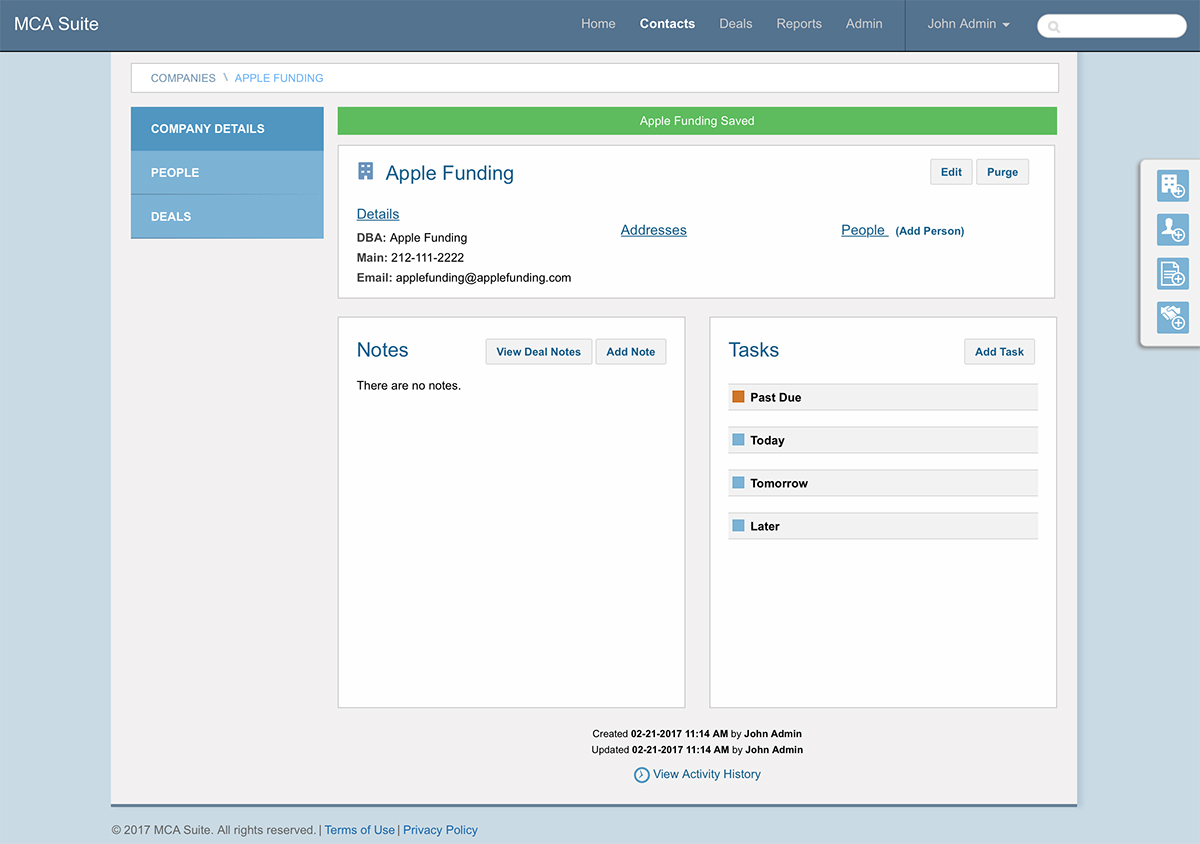
Now that we have your company in place, let’s add some people to it.
Step 3: Add a person to your company
The first person we’re going to add is John Smith, the owner of Apple Funding. A “Person” is another type of contact in MCA Suite and is any individual who serves as a point-of-contact for those companies (e.g., a merchant owner, a broker within a brokerage, etc.) or a single, individual contact unaffiliated with any company. Click the “Add Person” link on the company detail page to begin.
This will bring you to the add person page. Notice when you arrive here, the Company, DBA and any other information that was previously entered for the company has been pre-populated for you.
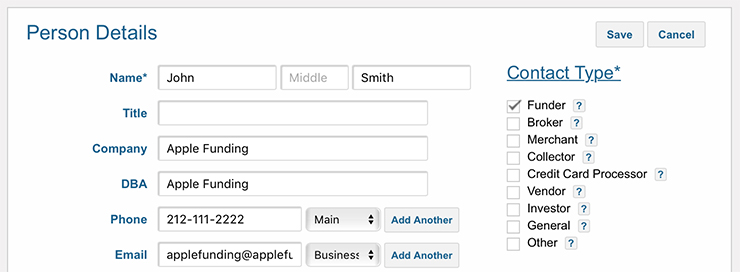
Similar to adding a company, there are only a couple of required fields: the person’s Name and the Contact Type. Let’s put in John Smith as this person’s name and click Save to continue.
The subsequent screen shows you the list of all the people in this company. Currently we only have John Smith. Since we know he’s the owner and our primary contact, let’s check those boxes off.
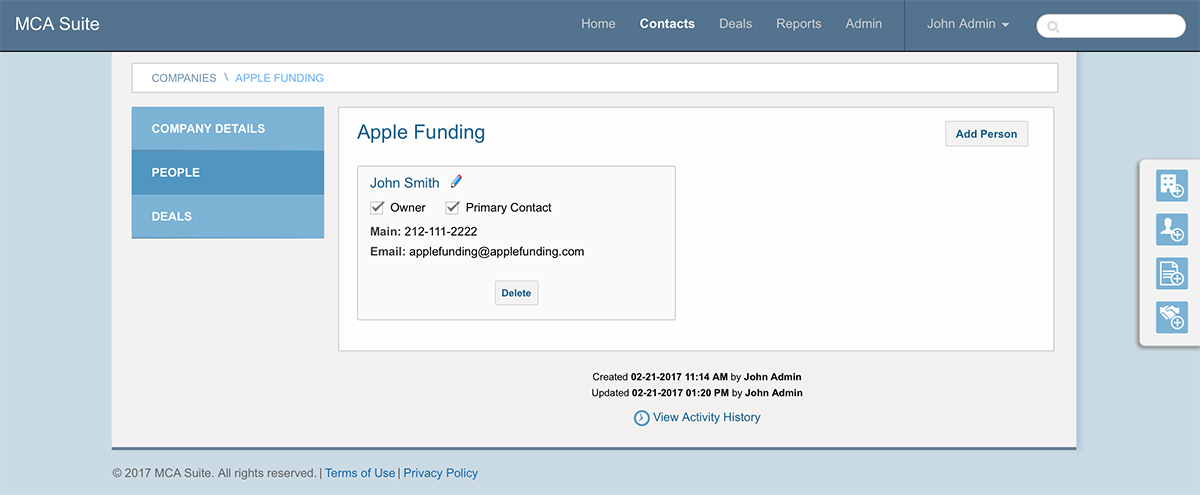
If there were other employees in this company or co-owners, we could add them as well but we’ll stick to just John for now.
Step 4: Associate your company with MCA Suite
We’ll need a way to distinguish your company from other funders, merchants, brokers, etc that you enter into the system. This is necessary for reporting and gathering performance metrics. To do so, click the “Admin” link on the navigation bar along the top of the screen, then click the “Setup” link on the left hand navigation. This will bring you to the account configuration page for your MCA Suite instance.
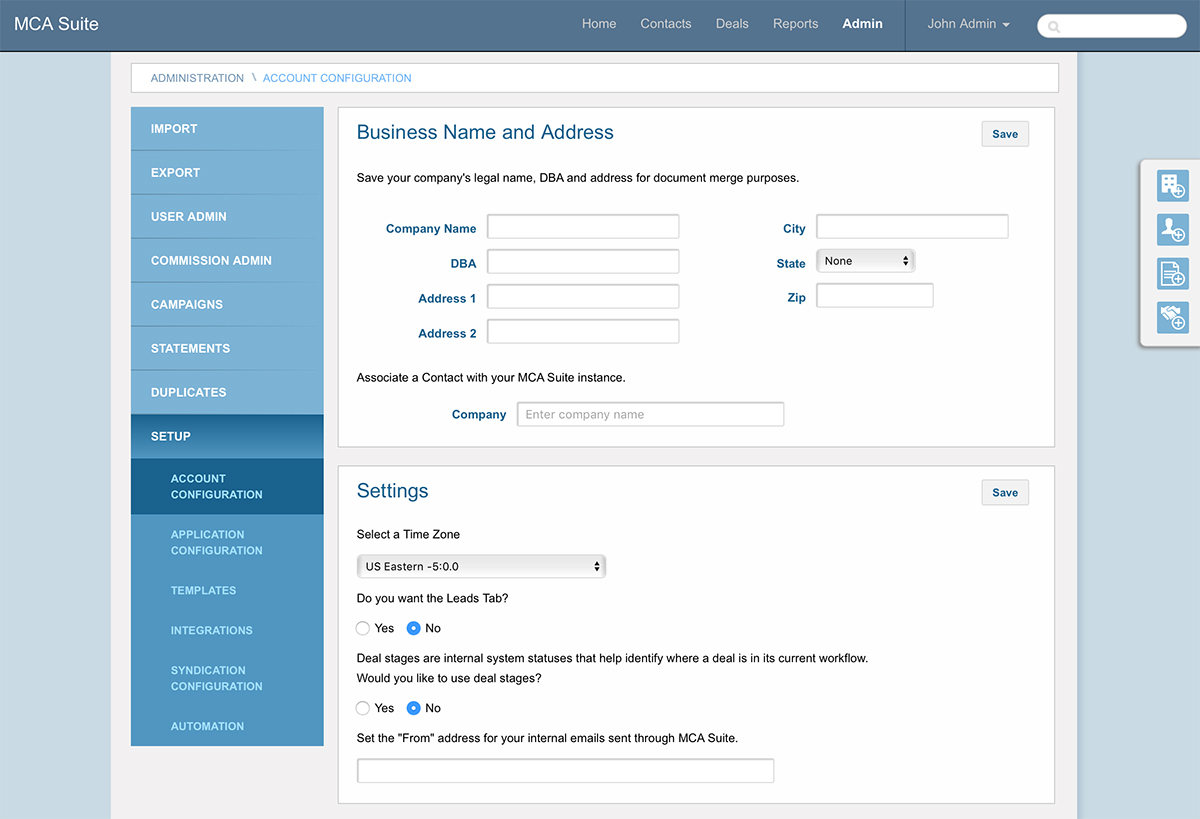
While there are a number of features in MCA Suite that you can customize, we’re just going to focus on the first section, Business Name and Address. At the bottom of that section, there’s a field that lets you “Associate a Contact with your MCA Suite instance.” Enter Apple Funding here.
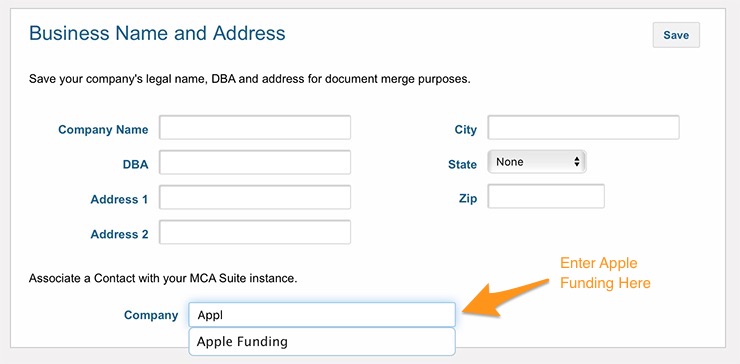
Note that as you start typing Apple Funding, the field will autocomplete by pulling existing companies from the system and listing them as options. Let’s select Apple Funding from the list and click save.
Step 5: Add a merchant application
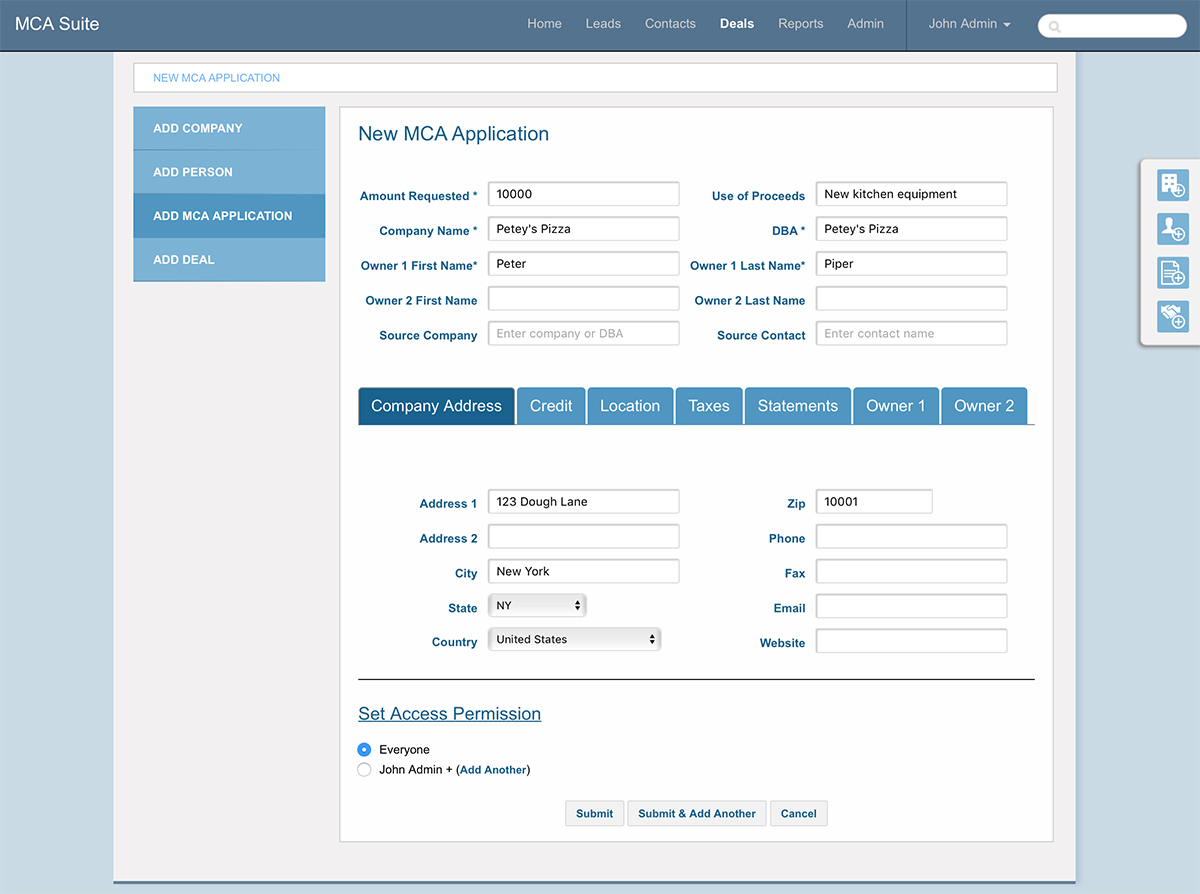
So to recap, you’ve created your company, Apple Funding, you’ve added John Smith as the owner, and you’ve associated your company with your instance of MCA Suite. Now you’re ready to accept a merchant application. In our example, Petey’s Pizza has requested $10,000 for new kitchen equipment. There are a couple of ways to do this in MCA Suite but we’ll stick to the more common route, which is filling out an application for the merchant. Using the quick links on the right, let’s click the 3rd icon from the top to add an application.
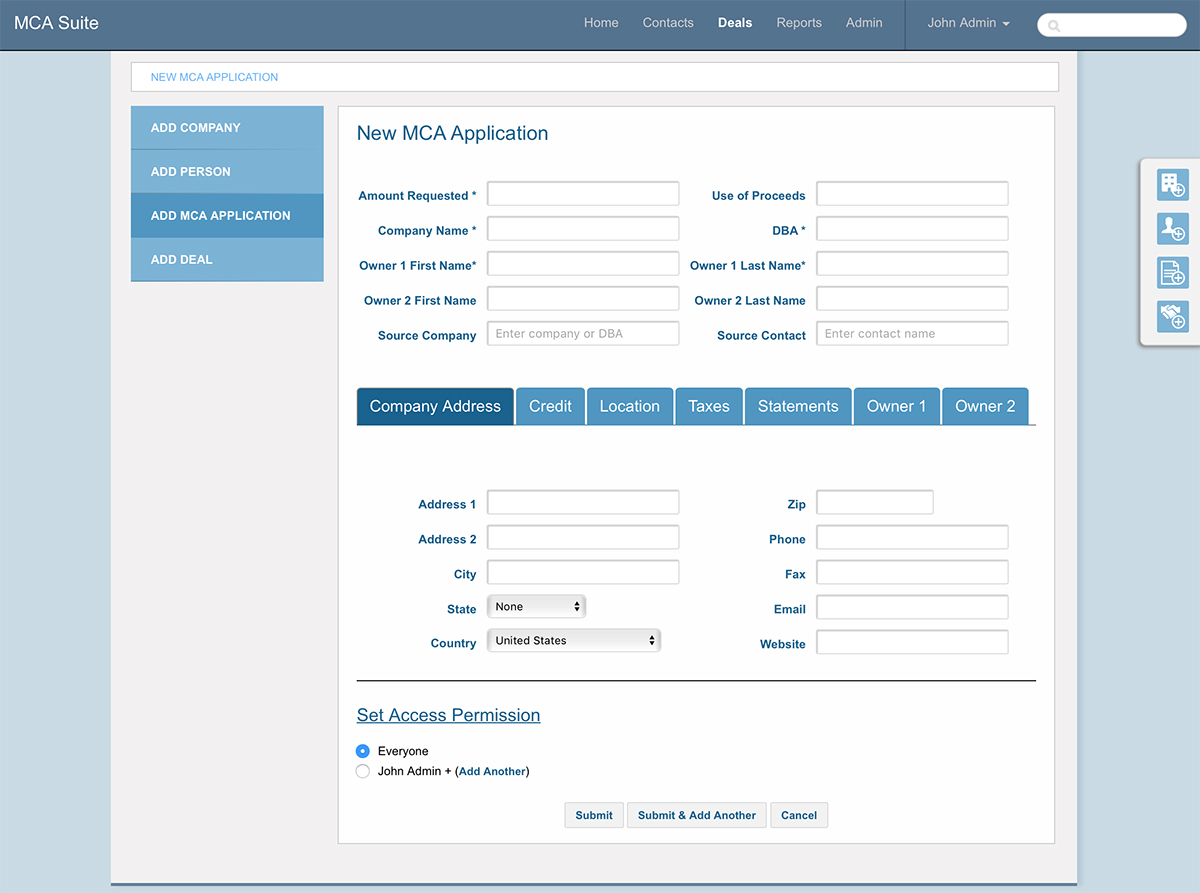
The MCA Application contains three main elements: company information, contact/owner information and deal details. It’s not meant to mimic your company’s application, but rather to capture information and then automatically create a company, a contact person and a deal in the system simultaneously, and build the relationship between them without you having to click through different pages.
A deal in MCA Suite typically represents a merchant cash advance deal. It contains many different parts, including offer details, collection methods, underwriting specifications, documents and attachments. It’s sometimes referred to as a file but is effectively the same thing.
Let’s fill out the application for Petey’s Pizza.

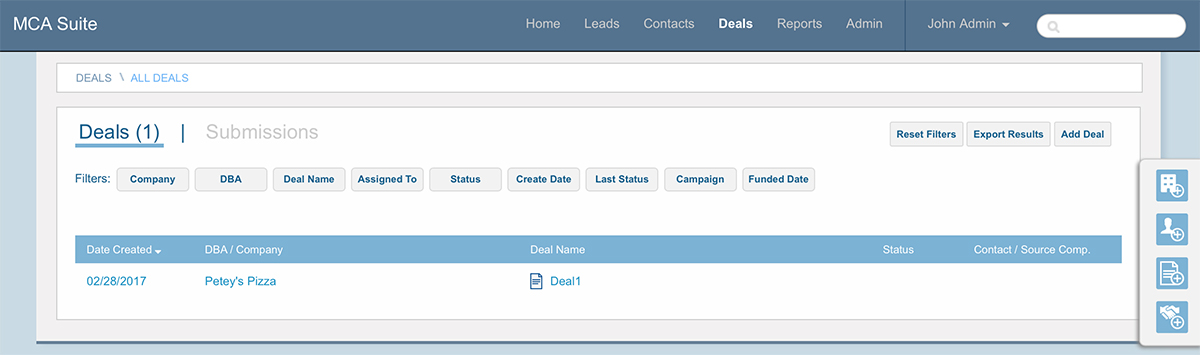
The only required fields are Amount Requested, Company Name, DBA and the owner’s First and Last name. There are other fields and separate tabs to enter more information about the merchant but for this exercise we’re only going to fill out the required fields. Continue by clicking the “Submit” button and you will be brought to the Deal Summary page.
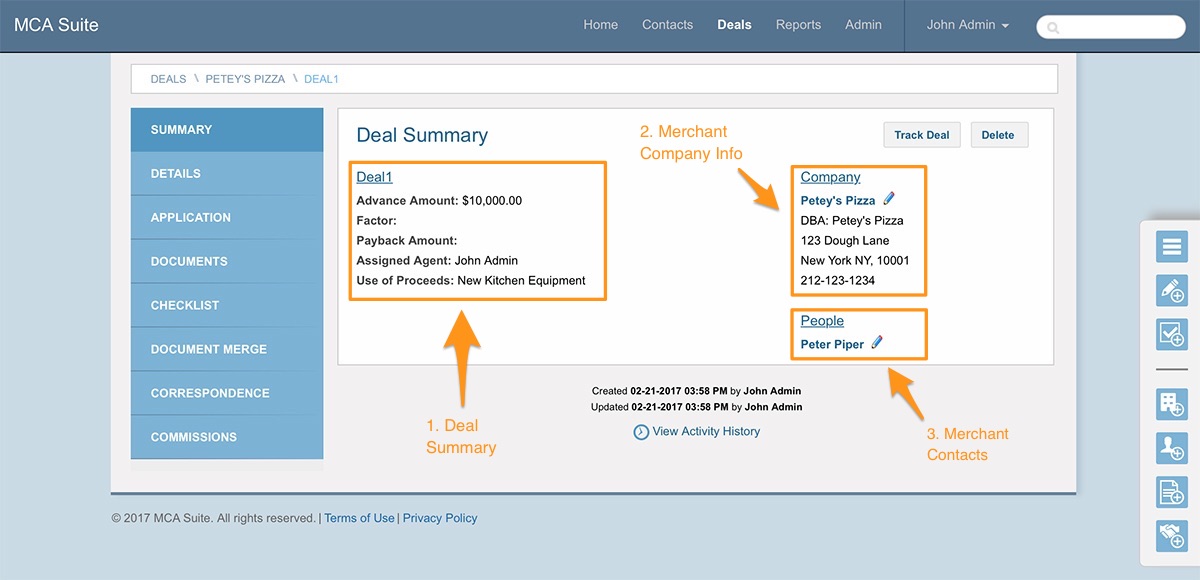
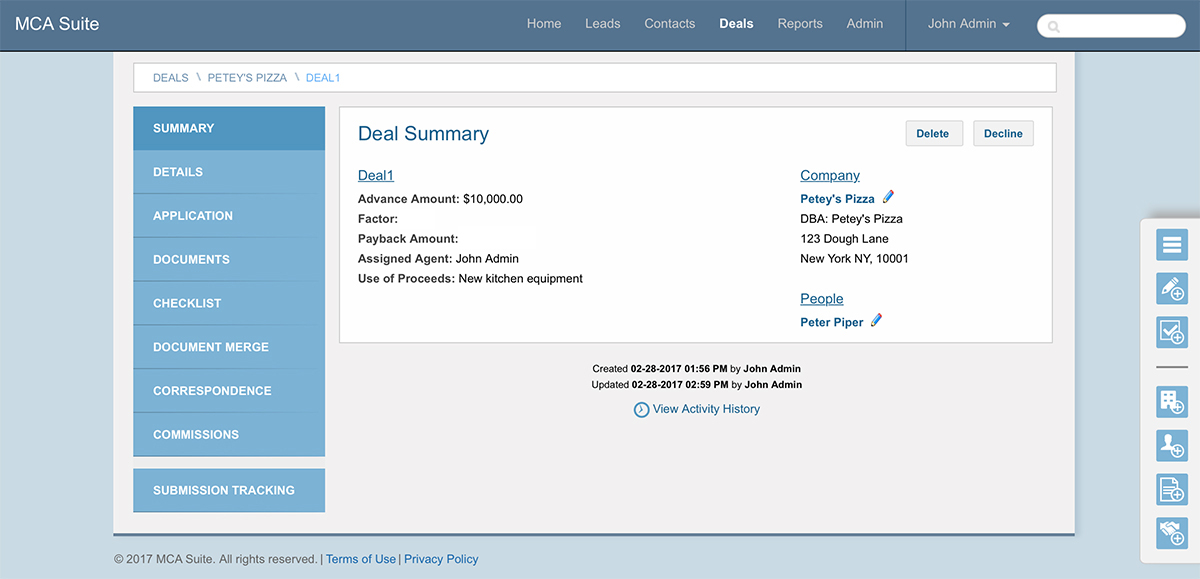
On this page, you can see that along with the deal, submitting the application also created a merchant company and a person affiliated with that company.
- Deal Summary – a summary about this deal taken from the information provided on the application. This deal has been named “Deal1” by default but you can change this behavior in the Account Configuration page.
- Merchant Company Info – the company Petey’s Pizza has been created for you automatically as part of the application submission process. You can click on the link for Petey’s Pizza or browse to your Contacts and Petey’s Pizza will appear just Apple Funding will since they are both companies in MCA Suite.
- Merchant Contacts – the person Peter Piper has also been created automatically and associated with this company as the owner.
Now that the merchant application has been submitted, let’s enter in contract terms for the deal and other relevant details.
Step 6: Configure the deal
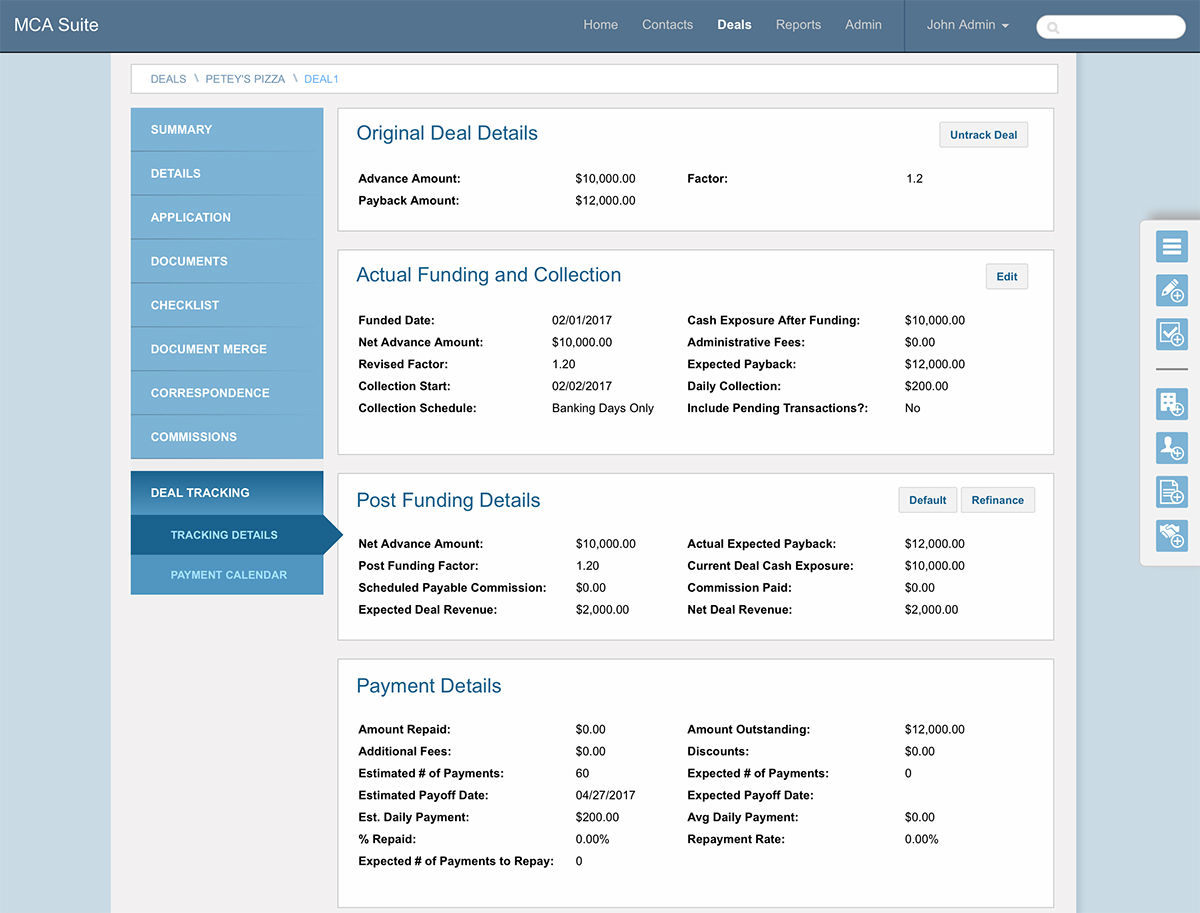
Click on the Details link on the left hand navigation bar to view a more thorough breakdown of this deal’s components.
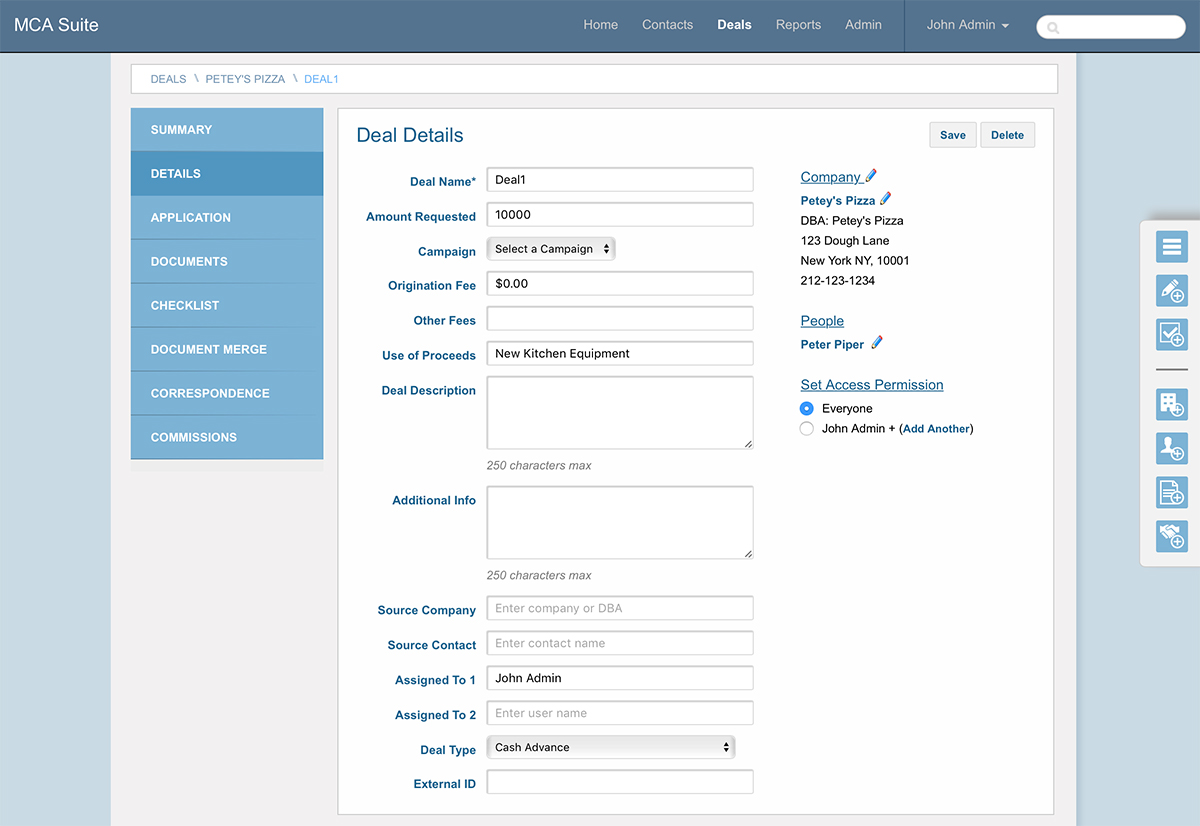
For now, we only care about entering in the contract terms for this deal. Scroll down toward the middle of the page and look for the section titled “Contract Terms”.
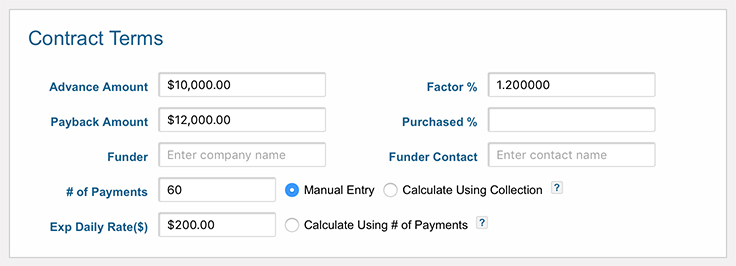
In this section we’re going to manually enter the factor (1.2), the number of payments (60) and the expected daily rate ($200). As you tab around between fields, the system will calculate any related fields for you, such as the payback amount.
There are a number of other fields we can fill out and some other options for calculations but we will leave them alone for the time being so we can move forward with the example. Click the Save button to continue.
When the page refreshes, you’ll notice a new button that wasn’t available previously called “Track Deal.”
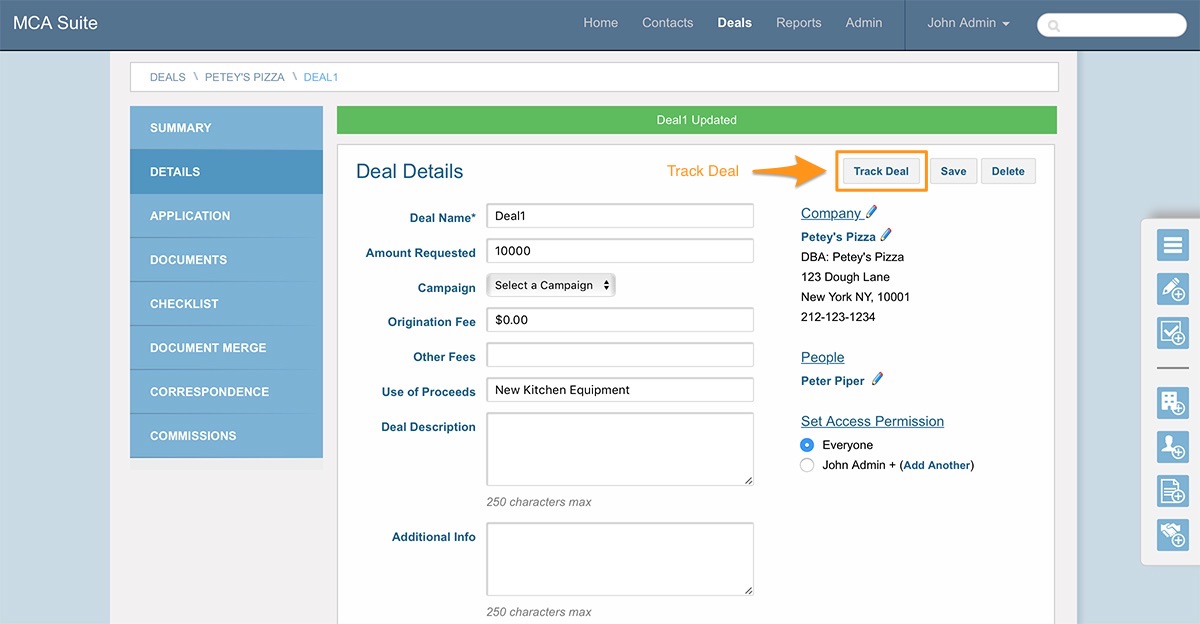
Now that the terms of the deal have been defined, we can start to track the deal, which is just a phrase that’s used to signify when a deal has been funded and to start performing any relevant calculations.
Step 7: Track the deal
Prior to funding a deal, a funder may still be discussing terms with the merchant, or collecting documents or working through the underwriting process. Once a deal has been tracked, the system assumes the deal has been funded and begins calculating metrics related to the deal. To start tracking a deal, click the “Track Deal” button. Doing so will bring you to the following page:
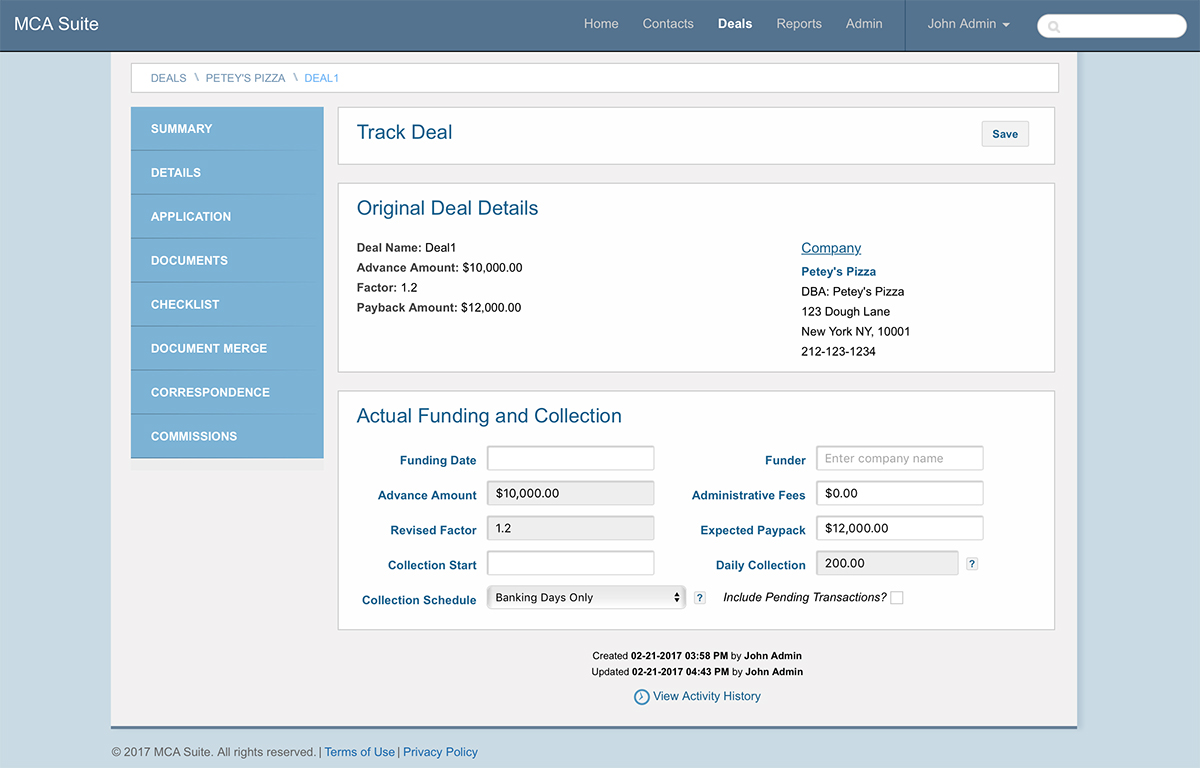
We’ll need to enter in some funding and collection details to proceed with deal tracking. Most of the fields have already been pre-populated for you but a few are still missing.
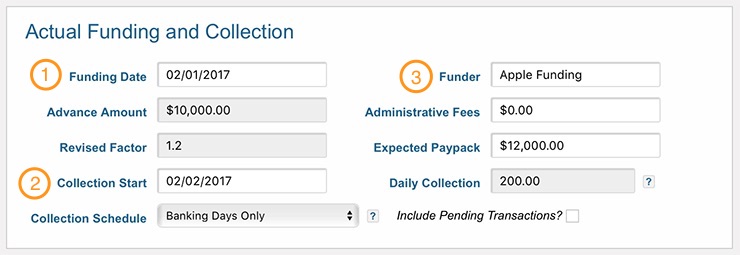
- Funding Date – the date this deal was funded
- Collection Start – the date collections for this deal began.
- Funder – in this example it will be Apple Funding but it’s possible the Funder can be another company or even multiple companies in the case of syndication.
Enter information for the fields listed above and click “Save” to continue. The following page lists a number of metrics about this deal, including payback, collections, average daily payments, repayment rate and cash exposure just to name a few. These values will update as payments are made and transactions are imported/entered to help you analyze and manage your portfolio.
Congratulations, you’ve completed the funder quick start guide and should now have a basic understanding of MCA Suite concepts, how to create companies, contacts, applications and deals, and how to track deals. For more detailed information, please refer to the user guide and the support site.
1.2.Broker Quick Start
For our quick start example as a Broker let’s assume your company, Orange Brokers, has generated a lead and would like to convert that lead to a deal and subsequently submit that deal to a funder, Apple Funding.
Step 1: Sign in to MCA Suite
Browse to the URL provided to you when you signed up with MCA Suite and use the credentials in the same email to log in.
When you first log in to MCA Suite, you will be brought to your dashboard. Note the main navigation bar along the top. It will serve as your primary means of navigating around the application. On the right hand side are a few icon links that help you get add information quickly: add a company, add a contact, add an application and add a deal.
It looks pretty empty at the moment, so let’s start adding some content.
Step 2: Create a Lead
In this example, Peter Piper is going to be our lead. He is a merchant looking for funding for his pizzeria. We’ll start by entering him into MCA Suite as a lead. Click on the ‘Leads’ link in the main navigation. This will bring you to the leads search page where you can see all of your leads listed along with some filters and quick actions that you can perform.
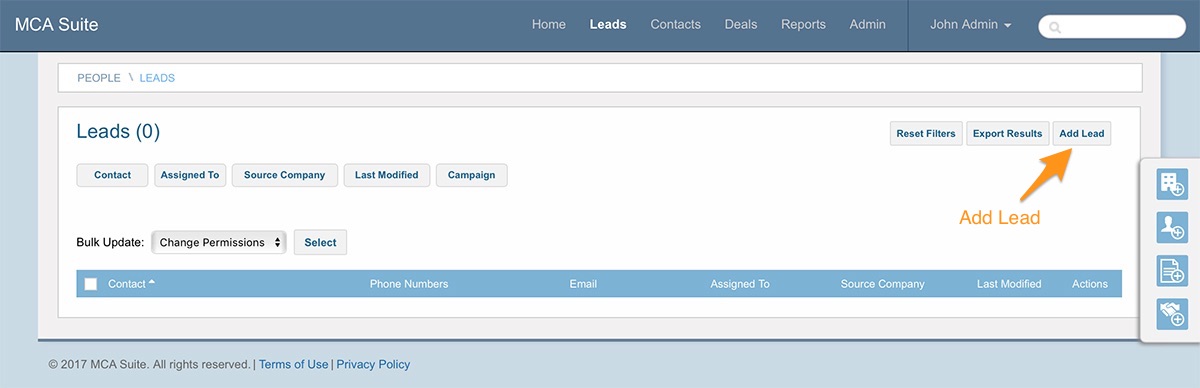
Currently you have no leads, so there is nothing listed. To add a lead, click on the Add Lead button. This will bring you to a form that lets you enter information about your lead.
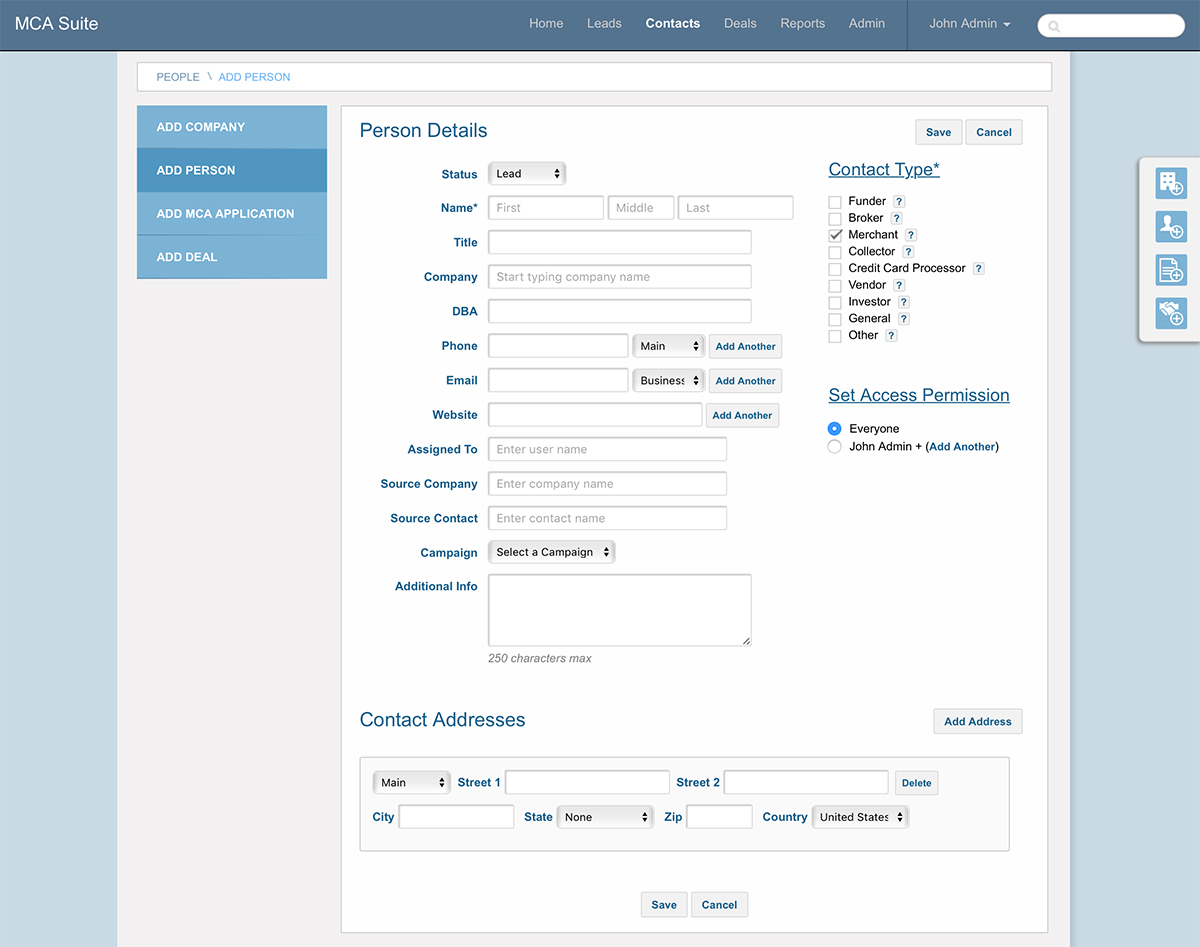
Leads in MCA Suite are a type of contact. Specifically, they are a person with a status of Lead (Click here to learn more about leads). Let’s enter in some info for our lead, Peter Piper. The only required fields are the name and the contact type. By default, the contact type has been set to Merchant for any leads.
While the company is not required, entering one now will save you some trouble later, particularly if the company doesn’t exist yet. Let’s enter Petey’s Pizzeria.
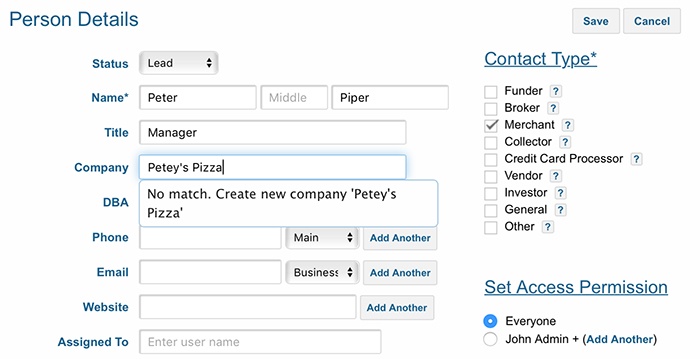
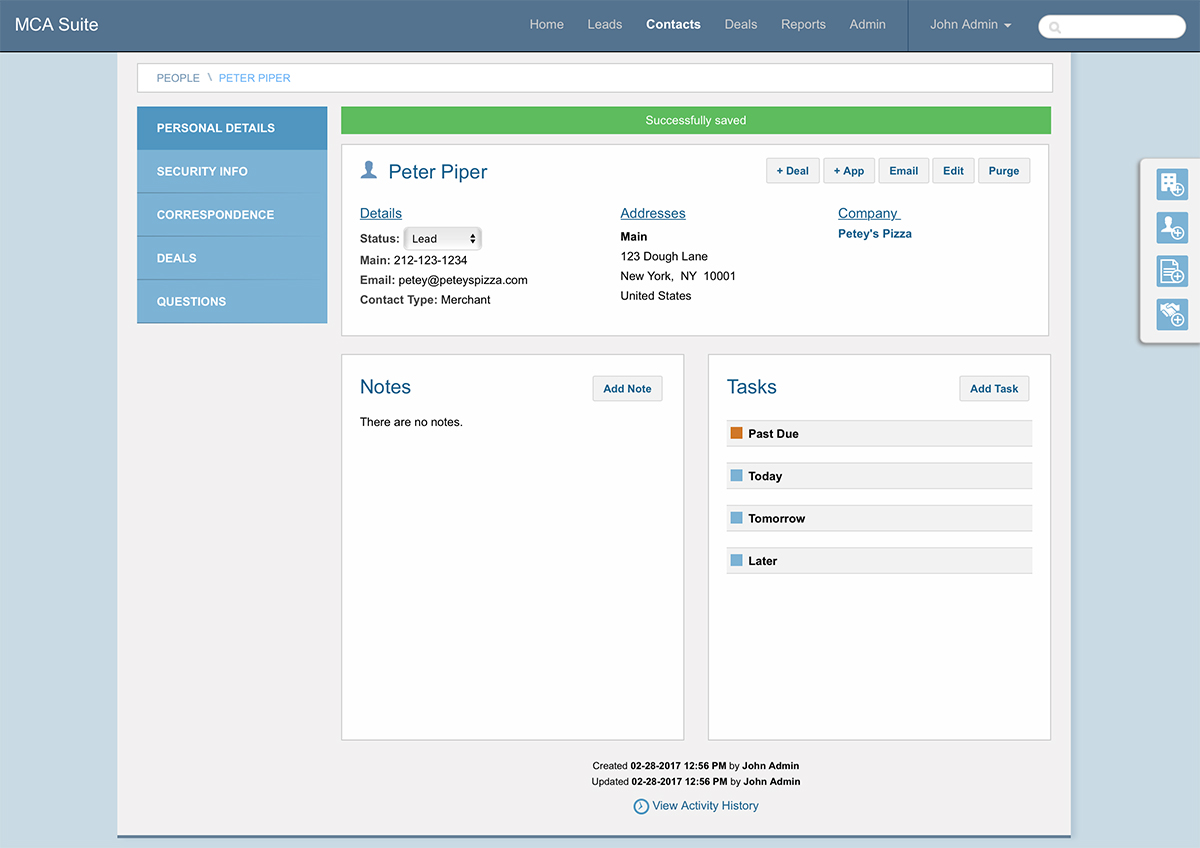
Notice as you type the company name in, MCA Suite tries to do a look up for an existing company that you created. Since there are no companies in the system, nothing will be matched. Instead, you have the option of creating a new company from what you’ve entered. Let’s select that option and then click Save. Once that’s done, you’ll be taken to the details page for that lead with a confirmation message up top.
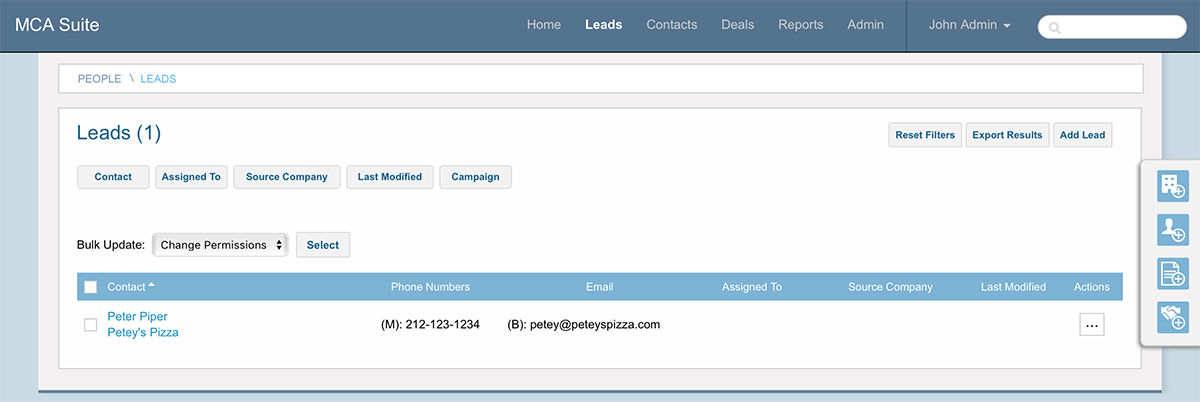
If we browse back to the leads search page, you’ll notice there’s now a record for Peter Piper:
Step 3: Add an application for the lead
Continuing with our example, let’s say you followed up with Peter and he would like funding for new kitchen equipment. We can gather a little more information about him and his business by filling out an application for him. From the leads search page, click the ellipses icon on the right hand side of the row with Peter Piper on it. That will open up a list of actions you can take.
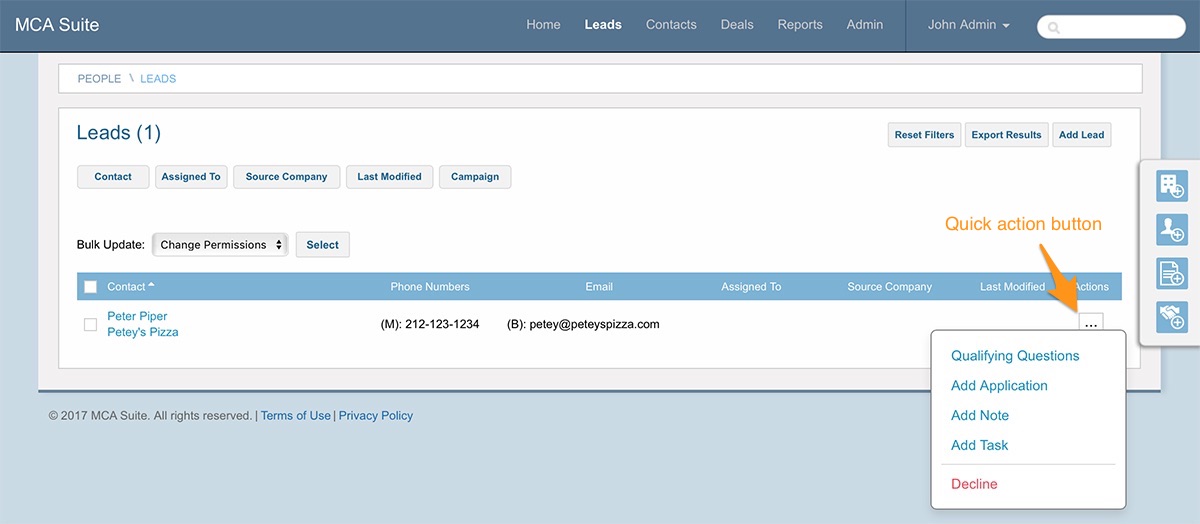
Click the Add Application link to begin Peter’s application. Doing so will bring you to the add application page. This is a capture form meant to help you add deal information about our existing lead, Peter Piper, as well as other information about the lead and his/her company. Note that some of the fields have been pre-populated with information we previously entered about Peter. While we can enter much more information about Petey’s Pizzeria, the only other required field is the amount requested. Let’s fill that in and click the Submit button so we can continue.
Once that’s complete a few things will have happened:
- A deal will be created in the system for Petey’s Pizzeria. A deal in MCA Suite represents a merchant cash advance deal. It contains many different parts, including offer details, collection methods, underwriting specifications, documents and attachments. It’s sometimes referred to as a file but is effectively the same thing.
- Peter Piper will no longer be a lead since there is a deal associated with him. If you browse back to the leads search page, you’ll notice he’s gone. If, however, you browse to the contacts, you’ll see that he’s still listed there since all leads are contacts.
After submitting the application, you’ll be brought to the Deal Summary page. This page shows summary information about the deal, the merchant company and the people associated with that company.
Note that a deal name (Deal1) was automatically generated. Don’t worry, you’re not forced to use that naming convention. You can always edit the deal name or modify how default names are generated under Admin > Settings.
Step 4: Create a funding company
So to recap, we started with creating a lead, Peter Piper, in the system. At some point Peter Piper reached out to you to help him find funding for his business, Petey’s Pizzeria, so we filled out and submitted an application, which then created a deal in our system and removed Peter from being a lead. Next we want to help Petey’s Pizzeria find funding. We’ll need to reach out to our funder network to do that. At the moment we don’t have any funders in the system, so let’s add one.
Click the quick link icon that looks like a building on the right hand side of the screen.
This will take you to the add company page. It’s similar to the add lead page in that you are adding a contact, only this time it will be a company instead of a person.
We need to create a record for each of your funders so we can maintain the relationship between the merchant and who is funding that merchant. Let’s add the funder from our example, Apple Funding. Fill in the required information by adding the company name, Apple Funding, and selecting a contact type of ‘Funder’.
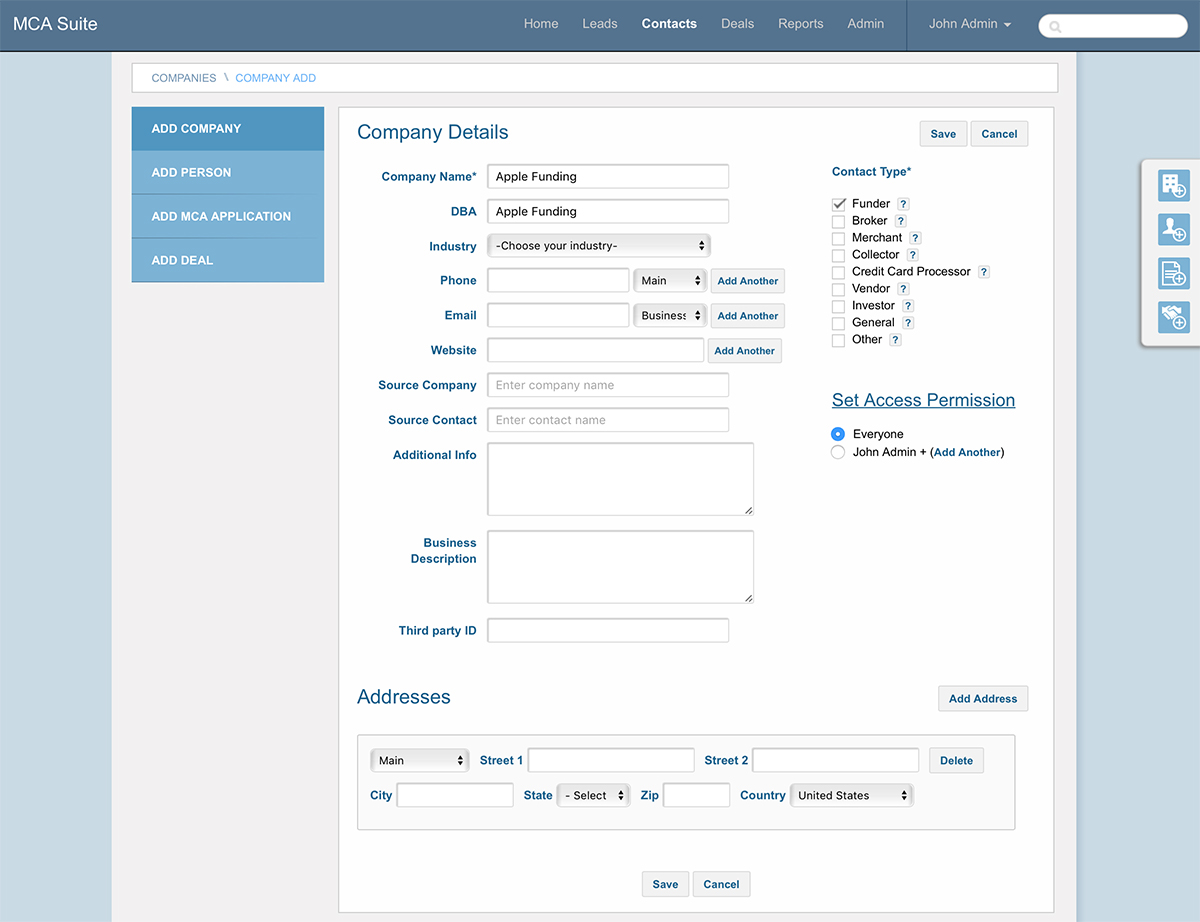
Again, we can add more information but for the purposes of this exercise we’ll leave the rest blank. Click the Save button to continue. This will bring you to the details page for Apple Funding confirming you’ve added them to the system.
Step 5: Submit the deal to the funder
Now that we’ve added our funding company, Apple Funding, we can start to submit our merchant’s request for funding to them. Let’s go back to our original deal by clicking on Deals in the main navigation. There should only be a single record – the deal we created for Petey’s Pizzeria earlier.
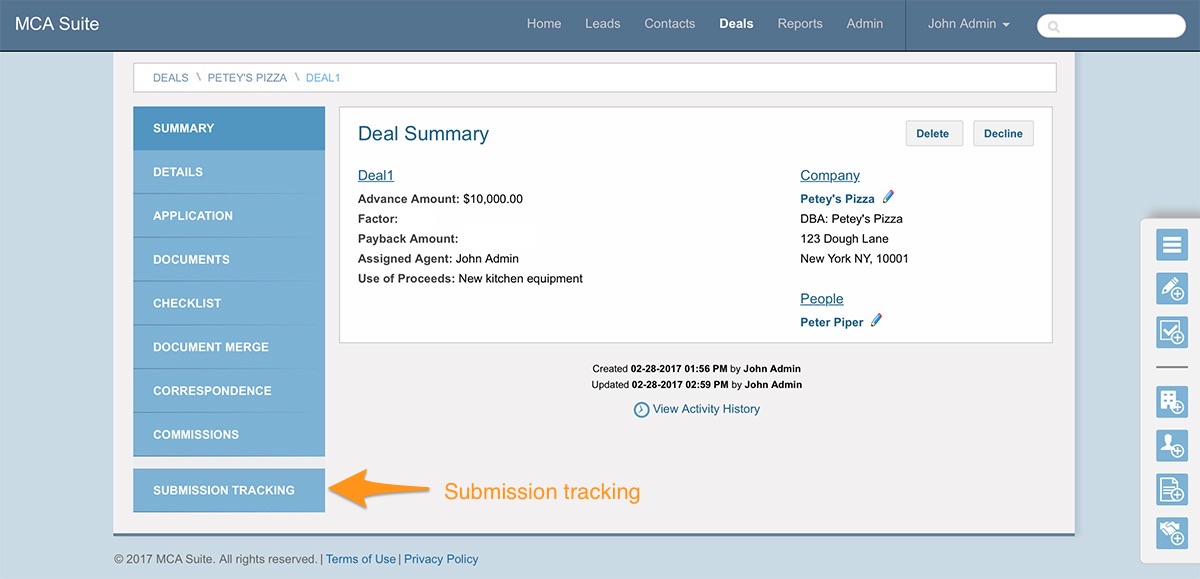
Click on the deal name link for that deal, Deal1. This will take us back to the summary page for that deal. From here, we want to click the ‘Submission Tracking’ link on the lefthand navigation. This will start the process of submitting this deal to funders.
Our first step is to decide the method of our submission.
![]()
Let’s keep this example simple and assume you already sent the documentation for this deal to Apple Funding via an email and are entering data into MCA Suite for record keeping. To do so, we’ll pick ‘Manual’. You can send an email out from MCA Suite with attachments to the funder but for the sake of keeping this example straightforward, we’ll stick with ‘Manual’. Click the Add button to continue.
Next up, we’ll need to decide which funder we’re submitting this deal to. You can of course submit to multiple funders, you just have to add them separately through this process so that each can have their submissions tracked independently. Since we only have one funder, let’s enter Apple Funding. Note again that as you type, a list will autocomplete for you below the text field. You can just click the Apple Funding option to complete your selection.
![]()
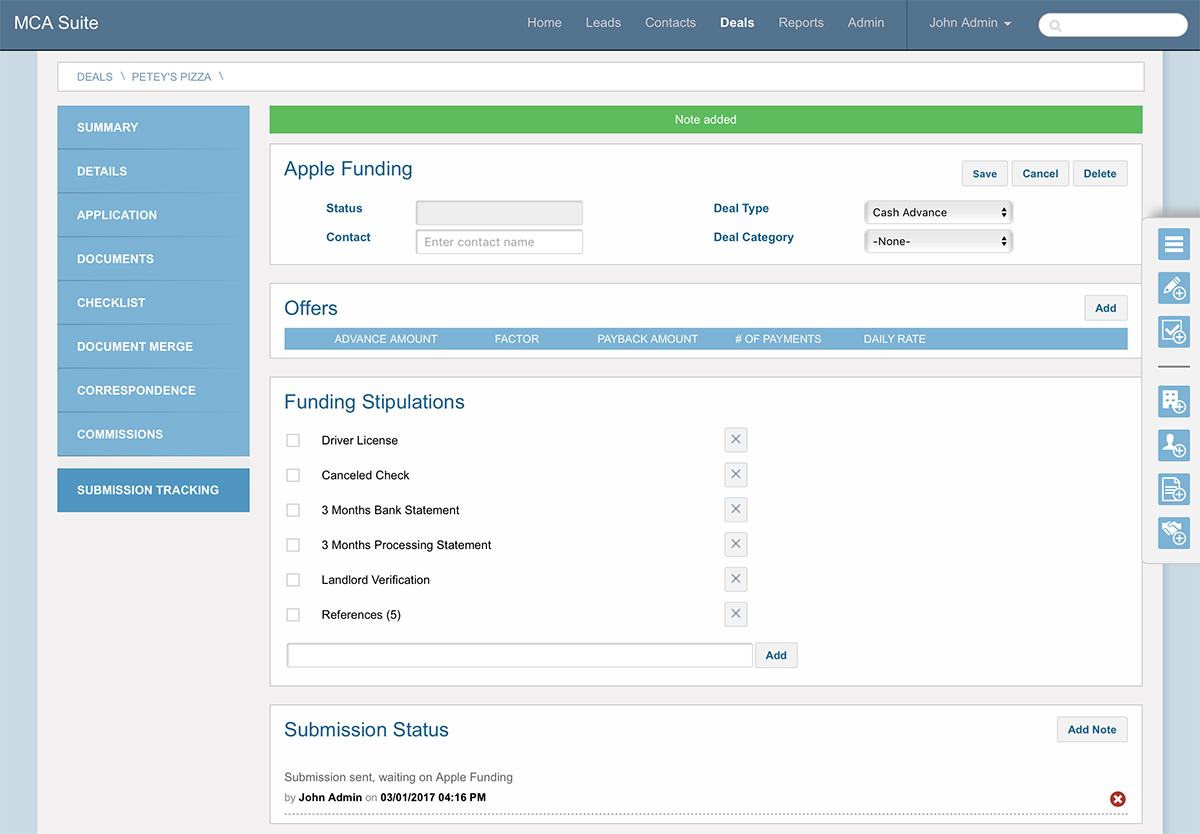
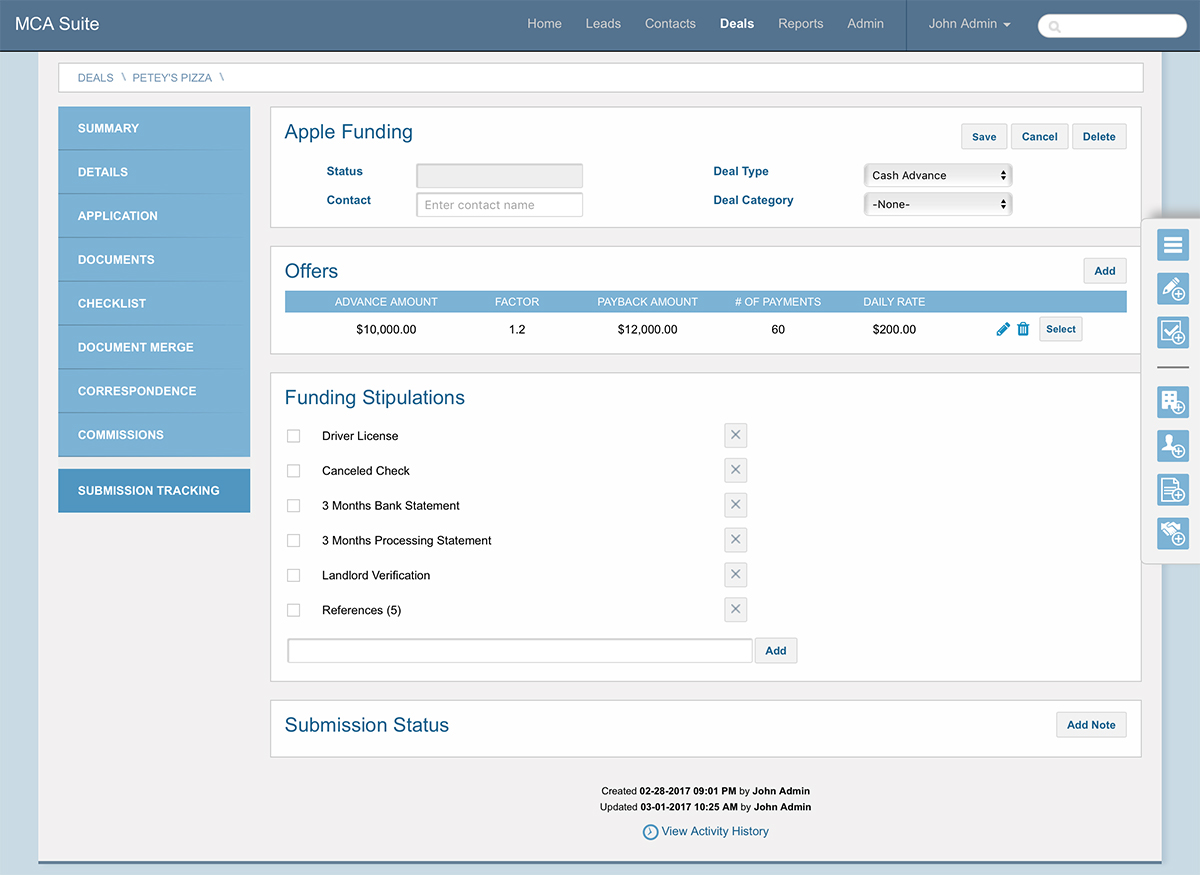
The other fields are not mandatory so we can leave them as they are. Click the Save button to continue. A submission has now been created for this deal. Let’s take a look at a breakdown of the resulting screen.
There are three important sections to be aware of that will help you manage your submission.
- Offers – add/edit/list the offer(s) that this funder has provided.
- Funding Stipulations – any requirements this funder has that can be reviewed prior to providing an offer, such as bank statements, credit history, etc. These stipulations can be added here or managed in the Admin section of the app.
- Submission Status – keep track of the status of this submission and where it falls in your workflow by adding notes and updating the submission status. Status settings can also be managed in the Admin section of the app.
Step 6: Add a note
Whenever there is any activity with this submission, we’d like to keep track of that. MCA Suite lets you do that by adding notes. Click the “Add Note” button on the Submission Status section. This will open a pop up:
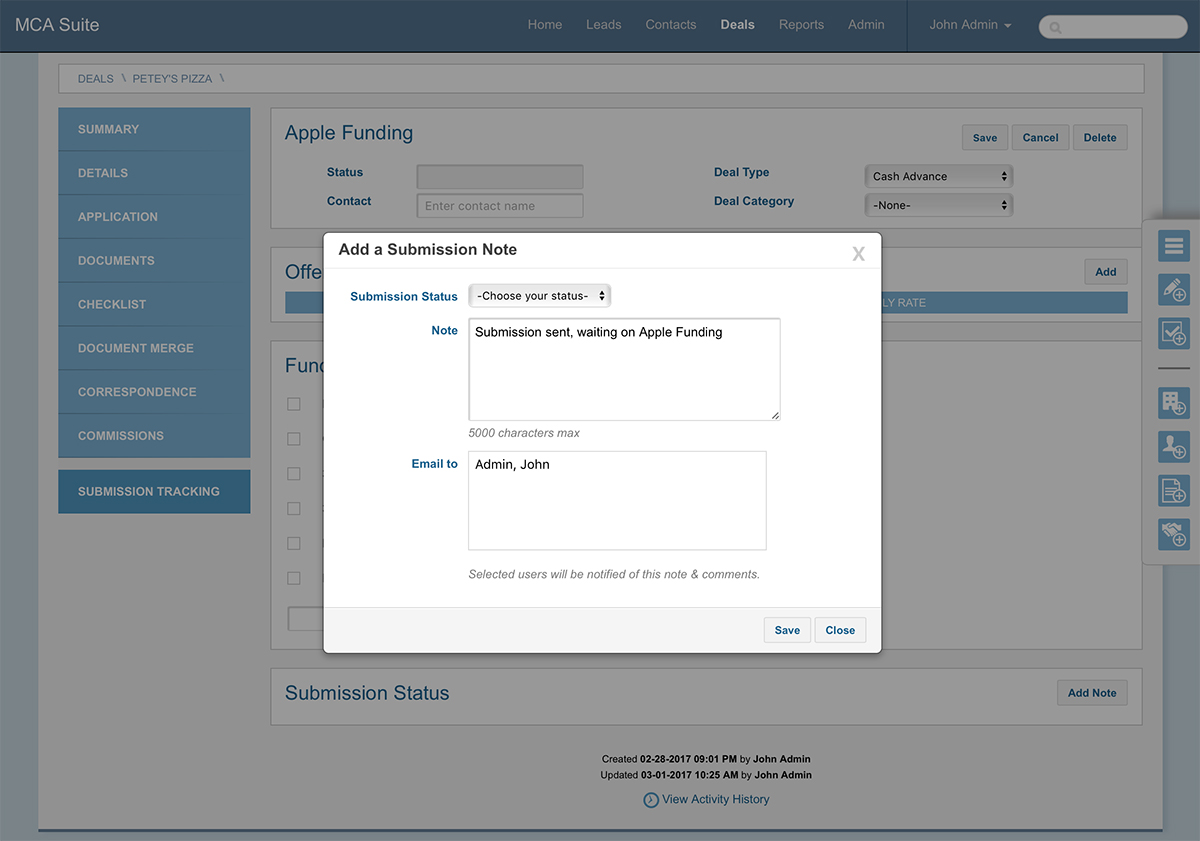
Here you have the option of setting a submission status. A submission status would be something along the lines of “Offer Sent” or “Stips Missing”. We haven’t set up any in our example so we can leave as is. Let’s add a note about this deal and click “Save”. You’ll see that the note gets added to the Submission Status section.
If there is any further activity on this submission, you can continue to add notes (and update the status) to reflect those changes.
Step 7: Add an Offer
Next, let’s assume that Apple Funding has reviewed the documents for Petey’s Pizzeria and has agreed to fund Peter. We’ll want to add that offer as part of the submission. To do so, click the ‘Add’ button in the ‘Offers’ section. This will bring us to the Add Submission Offer screen.
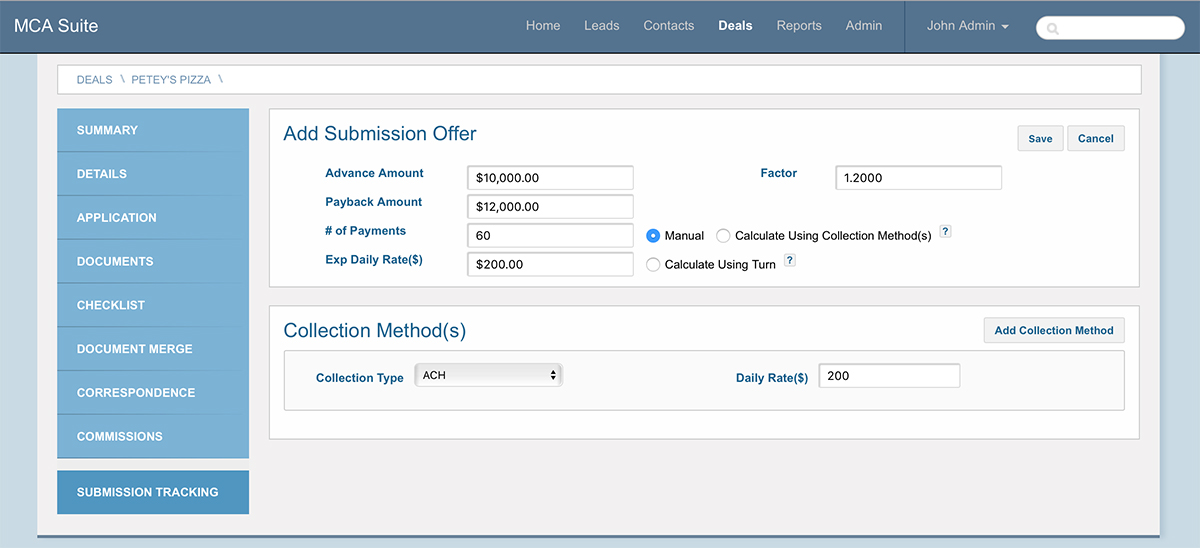
We’ll just put in a factor of 1.2, expected daily rate of $200 and 60 for the # of payments. The payback amount will be calculated for you automatically and you can toggle the radio buttons to calculate the other values. When that’s done, click ‘Save’ to continue. This will return us to the submission tracking page for Apple Funding and we can see that this offer has been added to the list.
It’s unlikely that you’ll receive more than one offer from a funder but that option is available to you if you’d like to add other offers from a specific funder.
Step 8: Complete the deal
The last step in this example is to finalize the deal. We’ve received an offer from Apple Funding and Peter has agreed to the terms. So we’re going to select this offer and start tracking the deal. Click on the ‘Select’ button for the offer we added earlier. This will open a pop up where you can add details to finalize this deal.
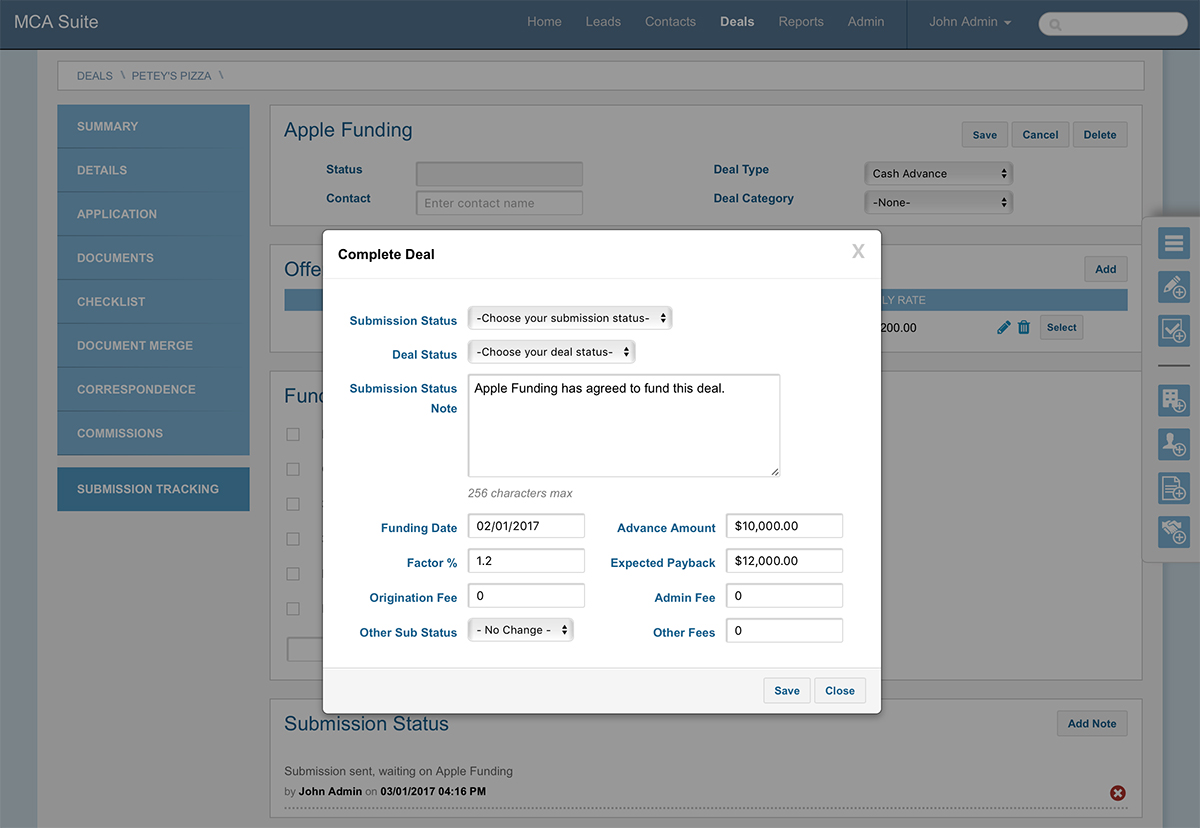
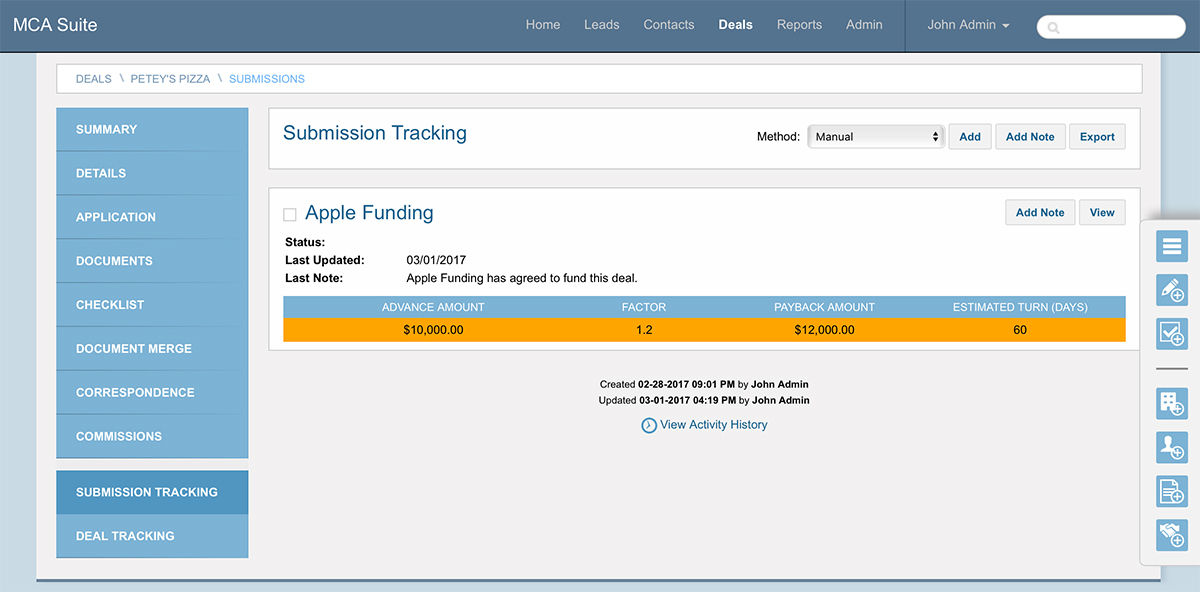
Again, you’ll have the option of setting a submission status. Likewise, you can update the deal status. Since we haven’t set either of those up, you can ignore them for now. Let’s enter a note, fill out the remaining fields and click ‘Save’. This will bring you back to the submission tracking page for Petey’s Pizza and have the selected offer for Apple Funding highlighted.
Congratulations, you’ve completed the broker quick start guide and should now have a basic understanding of some MCA Suite concepts and features – how to create leads, add applications, create companies and deals, and how to submit those deals to funders. For more detailed information, please refer to the user guide and our support site.
2.Setup and Onboarding
If you have a scheduled an onboarding training session with us, please read through this section beforehand.
- Read MCA Suite Concepts: http://bit.ly/mcasuite_concept
s - Read MCA Suite Setup Guide: http://bit.ly/mcasuite_setup
3.User Guide
Coming Soon!
3.1.Admin Setup
Something about setting up configuration in admin
3.2.What are Contacts?
3.3.What is a Deal?
3.4.What is an MCA Application?